
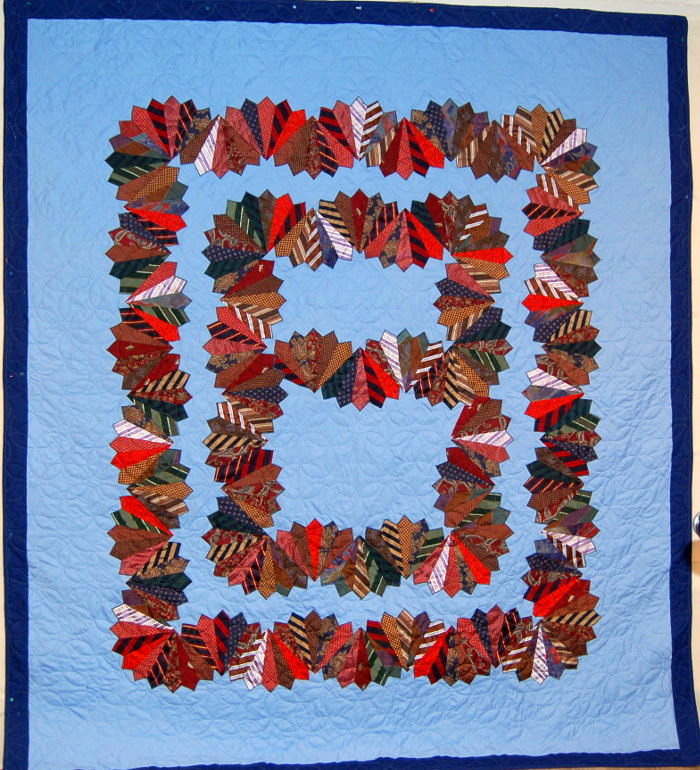
Amy’s “B” for Bobby
This Dresden Plate Tie Quilt was made for Amy in honor of her husband Bobby. She wanted the center display to replicate a “B” for Bobby. It is a bed-sized quilt which she sleeps under every night. This was the third tie quilt I made using the Dresden Plate pattern that resembled a vine. It has been very popular and some folks have asked how I made it, so I thought I’d lay out the steps for anyone with a basic quilter’s knowledge.
How to Make a Tie Quilt Using a Dresden Plate Design
Keep in mind that this is just one way to do it. There are other ways to make a tie quilt, possibly better ones. I’m happy with this one.
- Open up all the ties you plan to use. Don’t open up the entire tie if you only plan to use a part of it, as this is wasted work. For the tie quilt above I used almost every part of each tie.
- Iron out all the wrinkles you can easily get rid of. Some are steamed in and will remain there. No problem. These imperfections add to the interest of the quilt.
- Stabilize each tie, even though some may not need it. Better to err on the side of caution than to have a tie that is too flexible to easy cut and sew. My choice is Pellon EK-130 as it istabilizes the tie while remaining somewhat flexible rather than be stiff and unyielding. (Tip: Buy it only on sale at stores such as Joanns. It’s expensive.)
- Cut out all the pieces you will need, once you are sure of the size of your template. Experienced quilters know how to get that template from a software program or make their own. (Tip: Since I applique my blades, I cut off the seam allowance on the pointed end of the template so that the blade isn’t too long. Check the correct size for the block you are using before cutting the ties with it.)
- Choose the arrangement of each fan, which I think is the best part of making any Dresden Plate quilt. This is where art and eye trumps skill. I select all the groupings before sewing, arranging them in piles so that I’m not left at the end with only bad choices left.
- Sew each fan together, piling them up in groups ready to be glued to a block. (In the quilt above I used five small petals in each fan.)
- Attach adhesives to the outer edges of each peta, following the direction of the commercial adhesive found in any fabric store. This can be a laborious process, but it ensures the final outcome will look professional.
- Place the fan on the block carefully and secure the fan using a hot iron, always first covering the fan with a protective covering (found at any fabric store – or made from an old sheet.)
- Applique the edges of the attached fan. I find it works better with a stabilizer under the block as I sew.
- Display the fans into the arrangement you want. I use a design wall – a large stretch of muslin pinned on one of my living room walls to which I can pin on my fans. You can also use the floor or a large table or even a bed. The design wall is best because it allows you to step back and see the arrangment from a distance.
- Sew all the blocks together, row by row, once you are happy with your arrangement. I find it helpful to pin each block to the next one in the row so that I don’t inadvertently change their position before I can sew them. Sometimes I check each of the blocks in the row for the correct size before I sew them together. Once all the rows are sewn together, sew all the rows together.
- Border your quilt, if you want one. Amy preferred not to have a border, so the quilt above doesn’t have one.
- Select an appropriate backing (beforehand, of course) by either buying a wide backing (my choice) or sewing standard cotton fabric pieces together. The latter takes extra time and is usually more expensive as the backings now available are made with a looser weave. And they are ready to go since they are one large seamless fabric. Make sure that your backing is about 10 inches wider and longer than your quilt.
- Quilt your quilt. You can hand quilt it, machine quilt it using a sewing machine, quilt it on a long arm machine if you have one or can rent one. I quilt all my quilts on my own long arm. Some like to tie their quilts. Others send it out to a quilter who has a long arm.
- Bind your quilt. Other than adding a label, this is the last thing you need to do to complete your quilt. I cut out enough 1.75-inch strips of black (usually) cotton to cover the entire border of my quilt, sew them together, iron out the wrinkles and sew one side to the back of the quilt. I then fold it back over the front of the quilt, tucking in a seam’s width and secure it to the quilt by using an embroidery stitch on the front edge of the binding.
- And you are done!