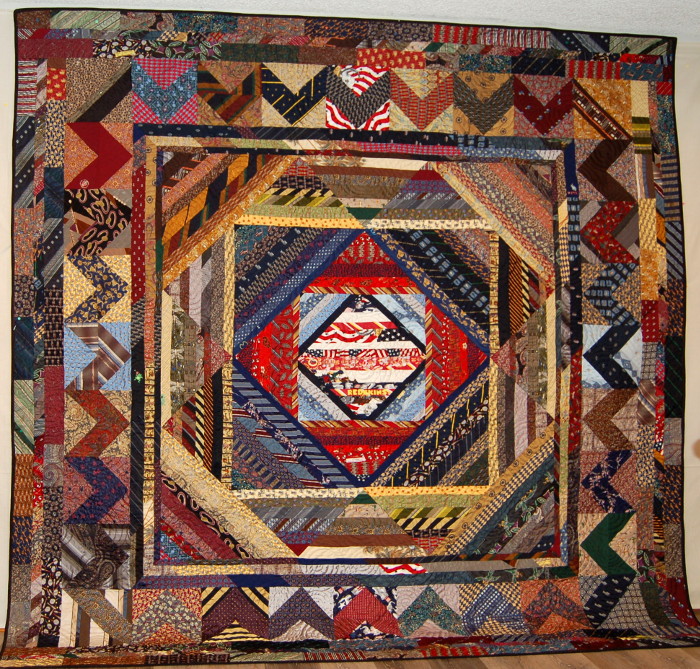
Tie Quilt using Cigar Silk Ribbon Pattern
Pattern refurbished by Kaffe Fassett as Red Ribbons

Unique Tie Quilt using Cigar Silk Ribbon Pattern refurbished by Kaffe Fassett
I received 140 ties from Tom, pretty much his entire tie collection. He was retiring and decided to put his ties to better use than sitting in a box. He left the design up to me, wanting only to have last approval. I found the perfect pattern for a king-sized quilt and Tom liked it. The idea for the quilt was borrowed from Kaffe Fassett’s Quilts in America, a book inspired by vintage American quilts. The original quilt didn’t use ties, but cigar silk ribbons. I thought it would be perfect for a tie quilt.
Story behind the Red Ribbon pattern
In the 1800’s American families of means prized their cigars, which came bound with silk ribbons. Women collected them for use in various ways, the most popular one was in a quilt. One pattern was so popular that pictures of quilts made with this pattern are readily available on the web. Each quilt was different as the lovely silk ribbons used to wrap the cigar vary in color. While yellow are the most prevalent, other colors were available.
Kaffe Fassett turned this unique antique pattern into a lovely design called Red Ribbons. As you might guess, he uses primarily red fabrics in his design. It looked like a great pattern for a tie quilt, as ties in many ways are elaborate ribbons. I followed Fassett’s instructions to a tee. Needing a king-sized quilt, I designed borders to enlarge the quilt.
First Tier
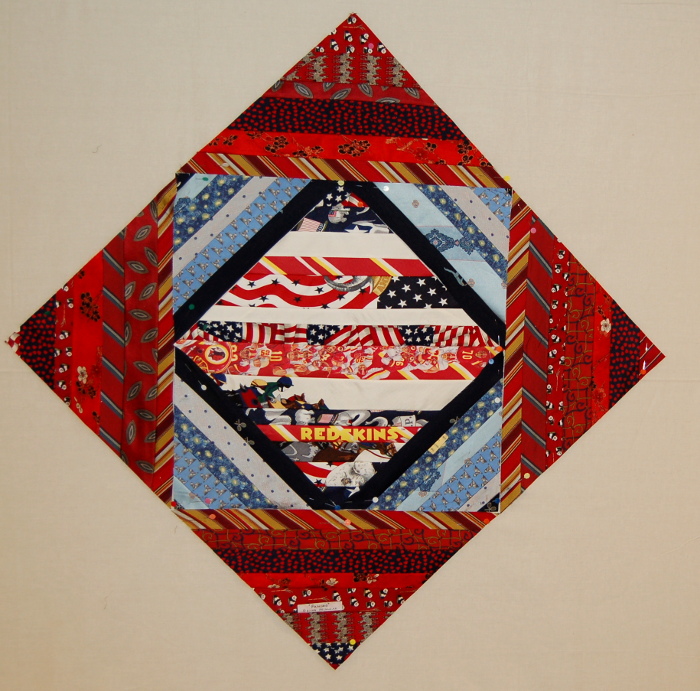
The pattern is similar to the Japanese nesting dolls, in that each tier encloses the one before it.
- My first job was to carefully open up and stabilize all the ties. Sometimes I only use a portion of each tie. This time I thought I’d need all the fabric.
- Next I chose ties which seemed to be Tom’s special ties. These had bold colors and made a statement. They were political ties, sports ties, unique ties and such.
- Following instructions, I constructed a paper template for the inner diamond shape.
- From each tie in this group, I cut out one or two strips. These were cut in varying widths from 1 inch up to 2-1/2 inches wide (plus a seam allowance). I usually cut as long a strip as I could.
- Before sewing the strips together I did two things. First I chose a strip that artistically fit in the arrangement. Next I checked each strip against the template to make sure it reached beyond the template.
- When all the strips were sewn together, I ironed my new ‘fabric’. Then carefully cut out the diamond, saving the scraps at the edges for later use.
Second and Third Tier
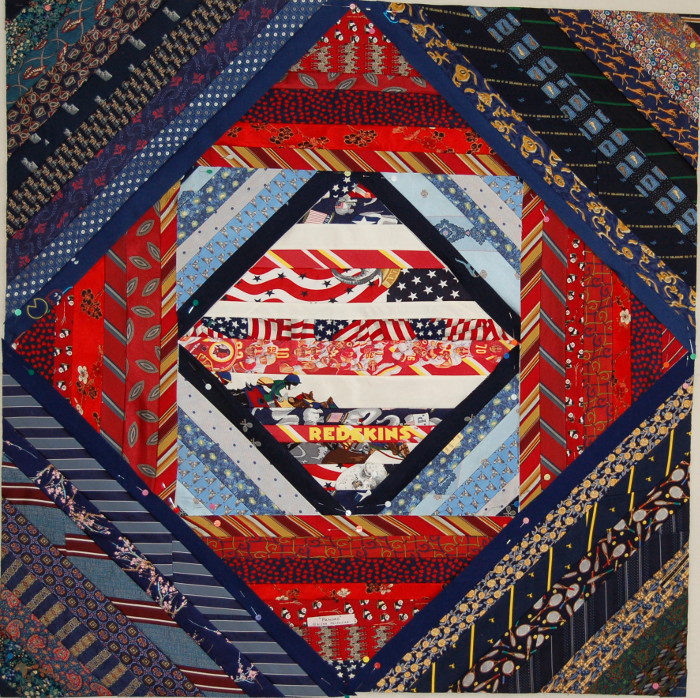
The next two tiers were constructed in a similar fashion, each tier encasing the diamond within it.
- For the second tier I chose a contrasting color scheme with a few light blue ties.
- In each corner I used the same ties but varied the position of the ties to achieve balance plus interest.

First, second and third tier of Tom’s king-sized tie quilt
- The third tier mirrored the red that stood out in the central diamond.
- I expanded the number of red ties as well as the positions of the ties, once again achieving balance but adding interest.
I think I could have stopped right there and had an interesting wall hanging.
Fourth Tier

Inner detail of Unique Tie Quilt – fourth tier
Making this quilt would not have been possible without the wonderful range of color Tom’s collection displayed. Not only were there both beautiful contrasting color schemes but the overall collection had a cohesive quality that allowed the colors to blend perfectly, saving it from being a mere collection of different ties.
- As the pattern expanded, so did my choices.
- The overall color scheme of this larger fourth tier was navy blue and gold.
- Despite this narrow boundary, Tom’s collection was so broad that I was able to choose completely different ties for each quadrant.
- The fourth tier is a great example of creating balance within a quilt while maintaining interest and variety.
